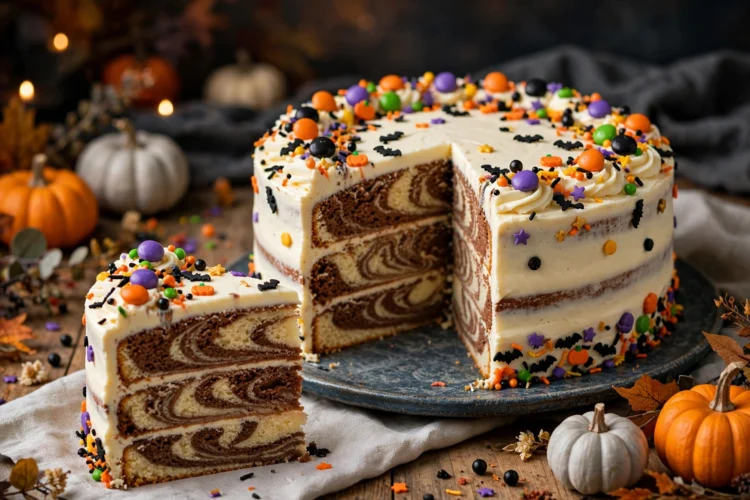
Every October, there’s one dessert that takes over my feed, and this year it’s the dot cake. If you haven’t seen it yet, picture this: a tall, gorgeous cake completely covered in neat little candy dots, like a polka-dot dream, in full Halloween mode — oranges, purples, blacks, and greens, with a blizzard of spooky sprinkles. It looks like something from a professional bakery. And then you find out the technique is basically “stick candies on a cake in rows,” and suddenly it feels very, very doable.
I’m not going to pretend this is a weeknight dessert. This is a project — a fun one, the kind you do on a Saturday afternoon with music playing and maybe a friend helping you place dots while you frost. But here’s why it’s worth it: the wow factor is completely out of proportion to the skill required. You don’t need piping expertise. You don’t need fondant skills. You need a steady hand, a bag of candy dots, and a little patience. The cake itself is a moist, tender chocolate-vanilla marble (or go full chocolate if that’s your crowd), and the buttercream is the silky American-style kind that takes color beautifully.
I’ve made this twice now — once for a Halloween party and once just because my niece wouldn’t stop talking about it — and both times, people photographed it before they cut into it. That’s the highest compliment a cake can get. Let’s make one.
Why you’ll love it
- Maximum visual impact, beginner-friendly technique. If you can frost a cake and stick on candies, you can make this. No piping bags required.
- A true party centerpiece. Set this on the dessert table and watch every guest pull out their phone.
- Customizable colors. Go classic Halloween, or switch the palette for birthdays, baby showers, or holidays — the dot technique works for everything.
- The cake itself is delicious. Moist marble crumb, silky buttercream — this isn’t a look-pretty-taste-meh situation.
- Great with kids. Little hands are perfect for placing dots. This is a genuinely fun family baking project.
- Make-ahead friendly. Bake the layers a day or two early; the whole thing assembles and decorates in under two hours.
Ingredients
For the marble cake (three 8-inch layers):
- 2 3/4 cups all-purpose flour
- 2 1/2 teaspoons baking powder
- 3/4 teaspoon fine salt
- 1 cup (2 sticks) unsalted butter, softened
- 2 cups granulated sugar
- 4 large eggs, room temperature
- 1 tablespoon vanilla extract
- 1 1/4 cups whole milk, room temperature
- 1/3 cup unsweetened cocoa powder
- 3 tablespoons hot water
For the vanilla buttercream:
- 1 1/2 cups (3 sticks) unsalted butter, softened
- 6 cups powdered sugar, sifted
- 1/4 cup heavy cream
- 2 teaspoons vanilla extract
- Pinch of fine salt
- Orange gel food coloring (for a Halloween tint, optional)
For decorating:
- About 2 lbs candy dots (Smarties-style or similar) in Halloween colors — orange, purple, green, black, white
- 1/2 cup Halloween sprinkles (bats, pumpkins, ghosts — go wild)
- Optional: a few candy pumpkins or gummy eyeballs for the top
You’ll also need: three 8-inch round cake pans, parchment paper, an offset spatula, and a turntable if you have one (not required, but it helps).
Instructions
Step 1 — Prep your pans and oven. Preheat the oven to 350°F (175°C). Grease three 8-inch round cake pans, line the bottoms with parchment rounds, and grease the parchment. Flour the pans lightly and tap out the excess. This triple-layer insurance means your cakes release cleanly every time.
Step 2 — Whisk the dry ingredients. In a medium bowl, whisk together the flour, baking powder, and salt. Set aside. Getting the leavening evenly distributed now means no bitter baking-powder pockets later.
Step 3 — Cream the butter and sugar. In a large bowl (stand mixer with the paddle attachment is ideal), beat the softened butter and granulated sugar on medium-high speed for a full 3 to 4 minutes, until pale, fluffy, and almost doubled in volume. This step is where the cake’s tender crumb comes from — don’t shortcut it. Scrape down the bowl halfway through.
Step 4 — Add eggs and vanilla. Beat in the eggs one at a time, mixing well after each, then add the vanilla. The batter may look slightly curdled after the eggs — that’s normal, and the flour will smooth it out.
Step 5 — Alternate flour and milk. With the mixer on low, add the flour mixture in three additions, alternating with the milk in two additions (flour, milk, flour, milk, flour). Mix just until each addition disappears. Overmixing develops gluten and makes the cake tough, so stop as soon as you see no dry streaks.
Step 6 — Make it marble. Transfer about one-third of the batter to a separate bowl. In a small cup, stir the cocoa powder and hot water into a smooth paste, then fold it into that third of the batter. Now you have vanilla batter and chocolate batter. Divide the vanilla batter among the three pans, then dollop spoonfuls of chocolate batter on top and swirl once or twice with a butter knife. Don’t over-swirl — you want distinct ribbons, not a muddy mix.
Step 7 — Bake. Bake for 25 to 30 minutes, until a toothpick inserted in the center comes out clean or with just a few moist crumbs. Let the cakes cool in their pans for 10 minutes, then turn them out onto wire racks to cool completely. Warm cakes melt frosting, so be patient — at least an hour.
Step 8 — Make the buttercream. Beat the softened butter on medium-high for 2 minutes until creamy. Add the powdered sugar one cup at a time on low speed (cover the mixer with a towel unless you enjoy powdered sugar clouds), then add the cream, vanilla, and salt. Whip on medium-high for 3 minutes until light and fluffy. If you want the Halloween look, tint it pale orange with a drop or two of gel coloring — go lighter than you think; it darkens slightly as it sits.
Step 9 — Stack and crumb coat. Place the first cake layer on your serving plate or cake board. Spread about 3/4 cup of buttercream on top, edge to edge. Repeat with the second and third layers. Then spread a thin layer of buttercream all over the outside of the cake — the crumb coat. It doesn’t need to be pretty; it just locks in the crumbs. Chill the cake for 20 to 30 minutes until the coat is firm to the touch.
Step 10 — Final frost. Apply a smooth, generous final layer of buttercream all over the cake, using an offset spatula and a turntable if you have one. Aim for smooth but don’t obsess — the dots will cover most of it. While the frosting is still soft and tacky (this is key — work in sections), start placing your candy dots.
Step 11 — Place the dots. Starting at the bottom edge, press candy dots into the frosting in neat horizontal rows, working your way up. Alternate colors in a pattern you like — I did orange, purple, green, black repeating, and it looked fantastic. The dots should sit close together, almost touching. If the frosting starts to crust before you finish a section, just frost that section fresh and keep going.
Step 12 — Finish and sprinkle. Once the sides are covered, do the top in concentric circles. Then scatter Halloween sprinkles generously over the top — don’t be precious about it, the messier the better. Add candy pumpkins or gummy eyeballs on top if you’re using them. Step back, admire your work, and take the photo before anyone touches it.
Pro tips
- Work with tacky frosting. Candy dots stick best to fresh, soft buttercream. If your kitchen is warm and the frosting crusts fast, decorate the cake in quadrants: frost one section, dot it, move on.
- Sort your candies first. Pour the dots into bowls by color before you start. Hunting for the right color mid-decoration is how patterns go sideways.
- Chill between coats. The crumb coat chill is the difference between a clean finish and a crumb-speckled mess. Don’t skip it.
- Level your layers. If your cake layers domed in the oven, slice the domes off with a long serrated knife so the layers stack flat. A wobbly tower is nobody’s friend.
- Room-temperature ingredients matter. Cold eggs and milk can curdle the batter and give you a dense crumb. Set them out 30 to 45 minutes before you start.
- Gel coloring over liquid. Gel food coloring gives you intense color without thinning the buttercream. Liquid coloring can make it runny if you add too much.
Variations
- All-chocolate version. Add the cocoa to the entire batter for a deep chocolate cake, and use chocolate buttercream under the dots. Dramatic and delicious.
- Birthday dot cake. Swap Halloween colors for pastels or rainbow dots and regular sprinkles — same technique, totally different party.
- Mini dot cakes. Bake the batter in a muffin tin (about 18 minutes) and decorate individual mini cakes. Adorable for a crowd.
- Different candy. M&Ms, Sixlets, or yogurt-covered raisins all work as “dots” — just pick something roughly uniform in size.
- Filling upgrade. Spread a layer of chocolate ganache or caramel between the cake layers for extra indulgence.
- Sheet cake shortcut. Bake in a 9×13 pan, frost the top, and dot the whole surface. Same look, half the stacking fuss.
Storage & reheating
This cake doesn’t need reheating — it’s served at room temperature. Store it in a cake carrier or loosely tented with foil at cool room temperature for up to 3 days. Refrigeration dries cake out, but if your kitchen is very warm, refrigerate it and let it sit out for an hour before serving so the buttercream softens. You can freeze unfrosted cake layers (wrapped tightly in plastic, then foil) for up to 2 months; thaw at room temperature before decorating. Once decorated, I don’t recommend freezing — the candy dots can weep color when thawed.
FAQs
How many candy dots do I actually need? For a three-layer 8-inch cake, plan on about 2 pounds. It sounds like a lot, but the sides eat up more than you’d expect. Buy extra — running out mid-decoration is stressful, and leftovers are just candy.
Can I use store-bought frosting? You can, but homemade buttercream is sturdier and stickier, which matters for holding the dots. If you go store-bought, whip it for a minute first to make it fluffier and easier to spread.
My dots keep falling off. What am I doing wrong? The frosting has probably crusted over. Press each dot in firmly, and work in smaller sections so the buttercream is always fresh and tacky when the candy goes on.
Can I make this ahead of a party? Yes — bake the layers up to 2 days ahead (wrap tightly), make the buttercream a day ahead (refrigerate, then re-whip before using), and decorate the day of or the night before. A fully decorated cake holds beautifully overnight at cool room temperature.
Is there a trick to getting the rows straight? Start each row at the same point and keep the spacing consistent. Honestly, though, slight imperfections look charming and handmade — nobody is measuring your dot spacing at a party.
This cake is pure joy on a plate. Make it, photograph it, and then watch it vanish in about ten minutes flat.